自從CentOS停止更新後,yum的處境好像也是岌岌可危,現在如果還在繼續用CentOS 7或8的用戶就會感受到很多不順,很多企業會遇到漏洞不但無法修補,後來新的程式要更新套件也都找不到可用的來源可以下載,而且不僅7和8有問題,舊版的CentOS 6現在也面臨了很多找不到更新檔可以下載的狀況,撇開這些問題不談,我也常常碰到開源軟體不再提供公開下載來源的問題,有時候只是想抓個網頁伺服器patch也沒有,所以後來開始研究有沒有辦法自己建立一台專門儲存repo的Linux伺服器,聽同事說RedHat已經另外弄了Rocky Linux給CentOS用戶做取代方案,本來我也想嘗試裝了一台來當repo server,但過程沒有非常順利,加上我的其他node都是用Centos 7,雖然想說早晚都要可能要面對,不過還是先以相容性優先,不要搞得太複雜。回歸正題,我用了一台Rocky Linux來製作repo server,而且也可以拿來當作RHCE考試題目的練習,一併把製作過程記錄下來。
一・基本配置
因為只是測試用,我也沒有開很大的資源,猜測要放repo的伺服器通常可能需要100GB以上的容量,但這次我只有開30GB,CPU和RAM就隨便給個4core和4GB即可。
二・安裝網頁伺服器
[root@centos7-test ~]# yum install httpd -y
[root@centos7-test ~]# systemctl enable httpd --now
[root@centos7-test ~]# systemctl enable httpd --now
 |
| 啟用阿帕契 |
三・防火牆打開網頁服務
[root@centos7-test ~]# yum install net-tools -y
[root@centos7-test ~]# firewall-cmd --add-port=443/tcp --permanent
success
[root@centos7-test ~]# firewall-cmd --add-port=80/tcp --permanent
success
[root@centos7-test ~]# firewall-cmd --reload
success
success
[root@centos7-test ~]# firewall-cmd --add-port=80/tcp --permanent
success
[root@centos7-test ~]# firewall-cmd --reload
success
四・安裝repo工具並建立repo路徑
[root@centos7-test ~]# yum install yum-utils createrepo -y
[root@centos7-test ~]# cd /var/www/html/
[root@centos7-test ~]# cd /var/www/html/
五・下載repo到網頁伺服器下的repo資料夾
[root@centos7-test ~]# reposync -g -l -d -m --repoid=base --newest-only --download-metadata --download_path=/var/www/html/repos/
[root@centos7-test ~]# reposync -g -l -d -m --repoid=centosplus --newest-only --download-metadata --download_path=/var/www/html/repos/
[root@centos7-test ~]# reposync -g -l -d -m --repoid=extras --newest-only --download-metadata --download_path=/var/www/html/repos/
[root@centos7-test ~]# reposync -g -l -d -m --repoid=updates --newest-only --download-metadata --download_path=/var/www/html/repos/
 |
| 下載進度會滿久的,因為資料會非常多, |
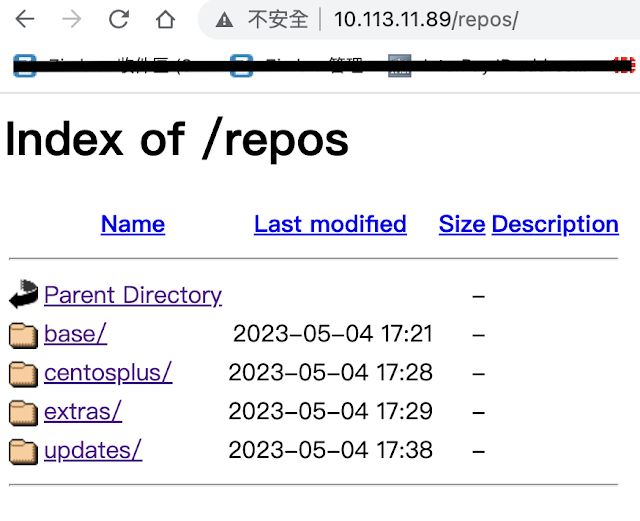
[root@centos7-test ~]# ll /var/www/html/repos/
總計 0
drwxr-xr-x. 4 root root 150 5月 4 17:21 base
drwxr-xr-x. 4 root root 55 5月 4 17:28 centosplus
drwxr-xr-x. 4 root root 55 5月 4 17:29 extras
drwxr-xr-x. 4 root root 56 5月 4 17:38 updates
六・建立repodata以供外部用戶連結
[root@centos7-test ~]# createrepo -g comps.xml /var/www/html/repos/base/
[root@centos7-test ~]# createrepo -g comps.xml /var/www/html/repos/centosplus/
[root@centos7-test ~]# createrepo -g comps.xml /var/www/html/repos/extras/
[root@centos7-test ~]# createrepo -g repomd.xml /var/www/html/repos/updates/
\\有可能會遇到沒有辦法自動建xml的情況,所以有需要就自己touch檔案,像repomd.xml就是我手動建立的
六・用排程自動化更新repo
\\要不要做這的功能因人而異了,不一定非要更新不可,因為CentOS和yum也差不多快停更了
[root@centos7-test ~]# cd ~
[root@centos7-test ~]# vim reposync.sh
\\用一隻shell並迴圈就可以定期跟官網更新了
#!/bin/bash
LOCAL_REPOS=”base centosplus extras updates”
for REPO in ${LOCAL_REPOS}; do
reposync -g -l -d -m --repoid=$REPO --newest-only --download-metadata --download_path=/var/www/html/repos/
createrepo -g comps.xml /var/www/html/repos/$REPO/
done
\\排程每兩個月去更新
[root@RockyLinux-test ~]# crontab -e
* * * */2 * sh /root/reposync.sh
 |
| 檢查看看網頁打開是否能見到所有repo |
這個服務還有一個好處,就是讓所有Linux主機在內網的環境裡下載套件,這樣對網路安全比較好,不需要讓每一台Linux都可以上外網。
這邊做好之後下一階段就是要讓用戶能下載repo了,到下一篇文章再說。


沒有留言:
張貼留言