MySQL資料庫很早就提供過可主從複寫功能,記得大概是前年有試著架設過,但當時火侯不夠,練非常久才測試成功,因為上網看別人做的步驟有些問題,所以這次測試成功後就得要自己紀錄一下,不然下次要做的時候又照著別人有誤的方式操作,會浪費太多時間。
一‧事前準備 三台VM,基本配備:
node1:10.113.112.84 mysql-mgr1(Primary)
node2:10.113.112.85 mysql-mgr2(Standby)
node3:10.113.112.86 mysql-mgr3(Standby)
(要先確認彼此都能ping或ssh得到)
二‧安裝MySQL資料庫
$ sudo apt install mysql-server
三‧設定root密碼
Securing the MySQL server deployment.
Connecting to MySQL using a blank password.
VALIDATE PASSWORD COMPONENT can be used to test passwords
and improve security. It checks the strength of password
and allows the users to set only those passwords which are
secure enough. Would you like to setup VALIDATE PASSWORD component?
Press y|Y for Yes, any other key for No: y
LOW Length >= 8
MEDIUM Length >= 8, numeric, mixed case, and special characters
STRONG Length >= 8, numeric, mixed case, special characters and dictionary file
Please enter 0 = LOW, 1 = MEDIUM and 2 = STRONG: 2
New password: 1qaz@WSX
Re-enter new password: 1qaz@WSX
Do you wish to continue with the password provided?(Press y|Y for Yes, any other key for No) : y
By default, a MySQL installation has an anonymous user,
allowing anyone to log into MySQL without having to have
a user account created for them. This is intended only for
testing, and to make the installation go a bit smoother.
You should remove them before moving into a production
environment.
Remove anonymous users? (Press y|Y for Yes, any other key for No) : y
Success.
Normally, root should only be allowed to connect from
'localhost'. This ensures that someone cannot guess at
the root password from the network.
Disallow root login remotely? (Press y|Y for Yes, any other key for No) : y
Success.
By default, MySQL comes with a database named 'test' that
anyone can access. This is also intended only for testing,
and should be removed before moving into a production
environment.
Remove test database and access to it? (Press y|Y for Yes, any other key for No) : y
- Dropping test database...
Success.
- Removing privileges on test database...
Success.
Reloading the privilege tables will ensure that all changes
made so far will take effect immediately.
Reload privilege tables now? (Press y|Y for Yes, any other key for No) : y
+--------------------------------------+
| UUID() |
+--------------------------------------+
| d8ea5108-57cc-11ec-93e1-000c292830dd |
+--------------------------------------+
1 row in set (0.00 sec)
mysql> exit
五‧三台node配置
先將config檔配置完成,並重啟MySQL
1.node1
$ sudo vim /etc/mysql/my.cnf
server_id=1
bind-address=0.0.0.0
gtid_mode=ON
enforce_gtid_consistency=ON
binlog_checksum=NONE
plugin_load_add='group_replication.so'
group_replication_single_primary_mode=ON
loose-group_replication_group_name="d8ea5108-57cc-11ec-93e1-000c292830dd"
loose-group_replication_start_on_boot=OFF
loose-group_replication_local_address= "10.113.112.91:33061"
loose-group_replication_group_seeds="10.113.112.91:33061, 10.113.112.92:33061, 10.113.112.93:33061"
loose-group_replication_bootstrap_group=OFF
report_host=10.113.112.91
$ sudo service mysql restart
2.node2
$ sudo vim /etc/mysql/my.cnf
server_id=2
bind-address=0.0.0.0
gtid_mode=ON
enforce_gtid_consistency=ON
binlog_checksum=NONE
plugin_load_add='group_replication.so'
group_replication_single_primary_mode=ON
loose-group_replication_group_name="d8ea5108-57cc-11ec-93e1-000c292830dd"
loose-group_replication_start_on_boot=OFF
loose-group_replication_local_address= "10.113.112.92:33061"
loose-group_replication_group_seeds="10.113.112.91:33061, 10.113.112.92:33061, 10.113.112.93:33061"
loose-group_replication_bootstrap_group=OFF
report_host=10.113.112.92
$ sudo service mysql restart
3.node3
$ sudo vim /etc/mysql/my.cnf
server_id=3
bind-address=0.0.0.0
gtid_mode=ON
enforce_gtid_consistency=ON
binlog_checksum=NONE
plugin_load_add='group_replication.so'
group_replication_single_primary_mode=ON
loose-group_replication_group_name="d8ea5108-57cc-11ec-93e1-000c292830dd"
loose-group_replication_start_on_boot=OFF
loose-group_replication_local_address= "10.113.112.93:33061"
loose-group_replication_group_seeds="10.113.112.91:33061, 10.113.112.92:33061, 10.113.112.93:33061"
loose-group_replication_bootstrap_group=OFF
report_host=10.113.112.93
$ sudo service mysql restart
六‧三台node建立replication的user帳號
三台node都要建立replication用的帳號
$ sudo mysql -u root -p
mysql> SET SQL_LOG_BIN=0;
mysql> CREATE USER 'replication_user'@'%' IDENTIFIED WITH mysql_native_password BY '1qaz@WSX';
mysql> GRANT REPLICATION SLAVE ON *.* TO 'replication_user'@'%';
mysql> FLUSH PRIVILEGES;
mysql> SET SQL_LOG_BIN=1;
mysql> CHANGE MASTER TO MASTER_USER='replication_user', MASTER_PASSWORD='1qaz@WSX' FOR CHANNEL 'group_replication_recovery';
七‧按順序啟動複寫
這個步驟很重要,尤其是身為Master的node1啟動程序必須優先於其他Slave
1.node1
mysql> SET GLOBAL group_replication_bootstrap_group=ON;mysql> START GROUP_REPLICATION;
mysql> SET GLOBAL group_replication_bootstrap_group=OFF;
2.node2
mysql> START GROUP_REPLICATION;3.node3
mysql> START GROUP_REPLICATION;來驗證一下主從複寫的結果是否正常:
mysql> SELECT MEMBER_ID, MEMBER_HOST, MEMBER_STATE FROM performance_schema.replication_group_members;
mysql> select member_host,member_state,member_role,member_version from performance_schema.replication_group_members;
可見複寫程序已經啟動,最後再來測試failover看看會如何。
八‧測試failover故障後角色轉移
將node1的MySQL關閉再重啟後,看看node2會不會從Slave升級為Master。
1.node1關閉MySQL
$ sudo service mysql stop
2.查看node2狀態
 |
| node1已經消失,node2升級為Primary |
3.重啟node1,並啟動複寫
$ sudo mysql -u root -p
4.查看最新的主從複寫狀態
 |
| 可以看到node1重新加入後降為Secondary |
4.關閉node2
$ sudo service mysql stop
5.查看node3狀態,並新增資料
mysql> CREATE TABLE playground.equipment ( id INT NOT NULL AUTO_INCREMENT, type VARCHAR(50), quant INT, color VARCHAR(25), PRIMARY KEY(id));
mysql> INSERT INTO playground.equipment (type, quant, color) VALUES ("slide", 2, "blue");
mysql> SELECT * FROM playground.equipment;
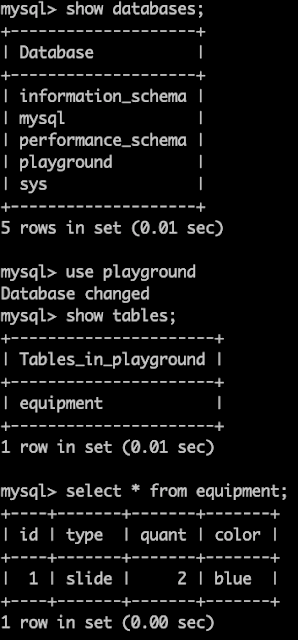
6.重啟node2,查看資料是否複寫
sudo mysql -u root -p
mysql> start group_replication;
 |
| node3變成primary |
mysql> use playground
mysql> select * from equipment;
 |
| node2重啟後有複寫,表示cluster是成功的 |
MGR算是滿容易懂的資料庫,但在啟動順序(第七步驟)上要多留意。


沒有留言:
張貼留言